

A mix can sound muddy, harsh, thin, or overly bass-heavy even when the speakers or headphones are perfectly capable. Often, the problem is not the equipment itself. It is the balance between different parts of the frequency spectrum.
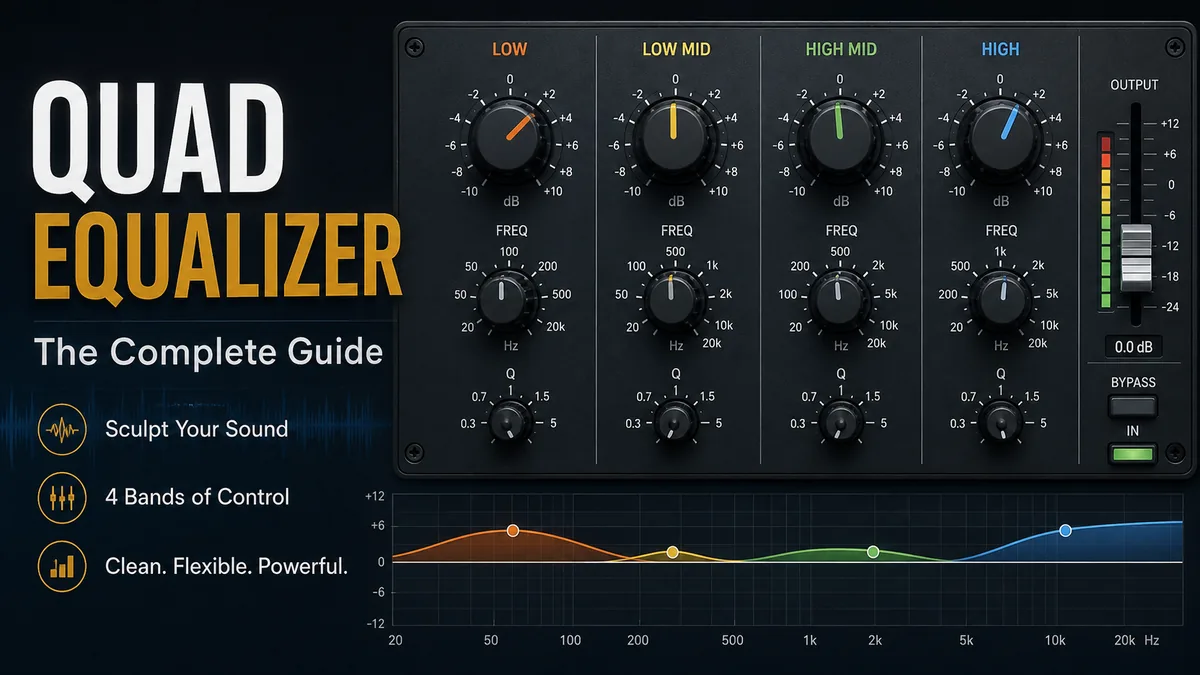
A quad equalizer gives you four useful areas of control. Instead of relying on basic bass and treble adjustments, you can shape lows, low-mids, high-mids, and highs separately. Depending on the design, each band may also provide control over frequency, gain, and bandwidth or Q.
A quad equalizer is generally a four-band equalizer used to shape an audio signal across four frequency regions. The bands commonly cover low, low-mid, high-mid, and high frequencies. By boosting or cutting these areas, you can control bass, muddiness, vocal presence, harshness, brightness, and overall tonal balance.
The term has another meaning in some technical and vintage contexts: it can describe equalization associated with four audio channels or quadraphonic sound. In modern music production and listening applications, however, it commonly refers to a four-band EQ.
What Is a quad equalizer?
An equalizer, usually shortened to EQ, changes the level of selected frequencies within an audio signal. Rather than simply turning the entire signal up or down, it lets you alter its tonal balance.
A four-band design divides that control into four sections.
| EQ Band | Typical Area | What You Hear |
|---|---|---|
| Low | 20–250 Hz | Bass, weight, thump, rumble |
| Low-mid | 250 Hz–2 kHz | Warmth, body, boxiness, muddiness |
| High-mid | 2–6 kHz | Presence, attack, intelligibility, harshness |
| High | 6–20 kHz | Brightness, detail, sparkle, air |
These ranges are guides rather than universal crossover points. A fully parametric EQ may allow considerable overlap between bands, while simpler hardware may provide fixed or partially adjustable frequency ranges.
A real example is Shure’s four-band parametric implementation, which allows independent frequency-range adjustments and uses peaking filters for the middle bands and shelving filters at the low and high ends.
That flexibility is what separates a capable four-band EQ from ordinary bass and treble controls.
How Does a quad equalizer Work?
Human hearing covers a broad frequency range, commonly represented in audio equipment as roughly 20 Hz to 20 kHz. Music, speech, environmental noise, and sound effects occupy different parts of that spectrum.
An equalizer uses filters to alter selected areas.
When you increase the level of an area, you boost it.
When you decrease its level, you cut or attenuate it.
Imagine a vocal recording with too much energy around the lower mids. The singer may sound cloudy or boxy. Cutting a few decibels in the problematic region can make the voice feel cleaner without reducing its overall volume dramatically.
Likewise, if speech lacks definition, a modest adjustment in the presence region may make words easier to distinguish.
A parametric design provides particularly precise control because you can normally adjust three main parameters:
- Frequency: where the adjustment is centered.
- Gain: how much that region is boosted or cut.
- Q or bandwidth: how wide or narrow the affected frequency range is.
Yamaha describes parametric EQ in essentially these terms: frequency selects the target area, gain controls boost or cut, and Q determines the width of the affected band.
Why four bands?
Two-band bass-and-treble controls are easy to understand but provide limited precision. At the opposite extreme, a 31-band graphic equalizer offers detailed control but can be excessive for everyday tone shaping.
Four bands occupy a useful middle ground.
You can address the low end, two important midrange regions, and the upper frequencies without managing dozens of controls.
Quick Takeaway: Four bands do not mean the sound itself contains only four frequency ranges. They simply provide four separate filter sections for shaping a continuous audio spectrum.
Understanding the Four Bands of a quad equalizer
Knowing what each region sounds like is more useful than memorizing frequency numbers.
Low frequencies: bass, weight, and rumble
The low band controls the bottom end of the spectrum.
This region contains characteristics such as:
- Kick-drum weight
- Bass-guitar fundamentals
- Sub-bass
- Low-frequency room rumble
- Impact and fullness
Too much low-frequency energy can make music sound boomy or obscure other elements. Too little can make a recording feel weak.
A low-shelf filter is frequently used here. Instead of changing one narrow group of frequencies, a low shelf raises or lowers frequencies below a selected cutoff point. Shure and Yamaha both document low-shelf filters as a way of adjusting the broader low-frequency region.
Do not assume that more bass automatically produces better sound. Excessive boosts consume headroom and can make speakers work harder.
Low-mid frequencies: warmth, body, and muddiness
The low-mid band is one of the most important areas to understand.
Vocals, guitars, keyboards, drums, and many other instruments contain significant information here. As tracks accumulate, so can low-mid energy.
That is where terms such as muddy, boxy, thick, and hollow often appear.
If a vocal or instrument feels congested, try a gentle cut rather than immediately boosting its high frequencies.
This illustrates one of the most useful EQ principles: sometimes you can make one quality more noticeable by removing the frequency range that masks it.
High-mid frequencies: clarity, presence, and attack
The high-mid area strongly influences perceived definition.
Important information here can include:
- Vocal intelligibility
- Guitar bite
- Percussion attack
- Snare presence
- Instrument definition
- Some forms of harshness
A modest high-mid boost may bring a sound forward in a mix. Too much can make listening tiring.
This region is also relevant to feedback and resonance control in live and installed sound. Parametric equalizers can use a narrow bandwidth to target a problematic frequency without cutting a huge portion of the surrounding spectrum.
Shure, for example, recommends identifying narrow resonant areas and then attenuating the problem frequency rather than applying an unnecessarily broad reduction.
High frequencies: brightness, detail, and air
The high band influences the upper end of the audible spectrum.
Boosting it can create a brighter or more open sound. Cutting it can soften recordings that feel excessively sharp.
A high-shelf filter is common in this position. It changes frequencies above a selected point rather than creating a narrow peak around one center frequency.
High-frequency EQ needs restraint. Increasing the highs does not restore detail that was never captured. It can also make hiss, cymbals, and sibilance more obvious.
Frequency, Gain, and Q Explained
If your quad equalizer is parametric, three controls matter more than almost anything else.
Frequency chooses where you work
Frequency is measured in hertz (Hz) and kilohertz (kHz).
For example:
- 100 Hz is in the bass region.
- 500 Hz sits in the midrange.
- 3 kHz is associated with upper-mid presence.
- 10 kHz is in the high-frequency region.
Selecting a frequency tells the EQ where to center an adjustment.
Gain determines how much you change
Gain is normally measured in decibels (dB).
A positive value boosts a region.
A negative value cuts it.
A setting of 0 dB means that band is not adding or subtracting level.
The exact adjustment range depends on the device. Professional systems can provide substantial boost and attenuation, but having a wide available range does not mean you should use all of it.
Small changes can be surprisingly audible.
Q determines how wide the adjustment is
Q controls bandwidth.
A higher Q generally produces a narrower adjustment around the selected frequency.
A lower Q affects a wider region.
Yamaha’s practical EQ guidance explains that high-Q settings are useful for more surgical changes, while lower Q values provide broader processing.
Think of the difference this way:
Broad Q: useful for general tone shaping.
Narrow Q: useful for targeting resonances, ringing, or other specific problems.
This distinction matters because cutting a troublesome frequency at 700 Hz does not necessarily mean you want to reduce everything from 300 Hz to 1.5 kHz.
Parametric vs. Graphic vs. Shelving EQ
The word equalizer covers several different designs.
| EQ Type | Frequency Control | Bandwidth/Q | Typical Purpose |
| Parametric EQ | Adjustable | Adjustable | Precise tonal correction |
| Semi-parametric EQ | Adjustable | Usually fixed | Simpler frequency shaping |
| Graphic EQ | Fixed bands | Fixed | System-wide tonal adjustment |
| Shelving EQ | Adjustable/fixed cutoff | Broad | Bass or treble shaping |
Parametric equalizer
A fully parametric equalizer normally gives you control over frequency, gain, and Q.
That makes it extremely flexible.
A four-band parametric EQ effectively provides four independently adjustable filters. The filters may overlap, allowing complex tonal shaping from relatively few bands.
Graphic equalizer
A graphic equalizer provides several fixed frequency bands controlled by sliders or equivalent digital controls.
You choose how much to boost or cut each existing band rather than freely selecting its center frequency.
Graphic EQ is intuitive because the slider positions create a visual representation of the approximate frequency response.
Semi-parametric equalizer
A semi-parametric design usually lets you adjust the center frequency and gain but has a fixed bandwidth.
It gives more control than a simple fixed-frequency EQ but less precision than a fully parametric system.
Shelving filters
Shelving EQ is especially useful at the extremes of the spectrum.
A low shelf changes everything below a selected frequency, while a high shelf changes everything above its selected point.
Many four-band designs combine shelves and peaking filters rather than using four identical filter types.
How to Set a quad equalizer Step by Step
There is no universal EQ curve that works for every speaker, headphone, room, song, microphone, or voice.
A better approach is to identify a specific problem and make the smallest adjustment that solves it.
1. Start with a flat EQ
Set all gain controls to 0 dB or select the flat/bypass option.
A flat starting point gives you a reliable reference.
Do not begin by automatically boosting bass and treble. Listen first.
2. Identify what actually sounds wrong
Describe the problem in ordinary language.
Does it sound:
- Boomy?
- Muddy?
- Boxy?
- Nasal?
- Harsh?
- Dull?
- Thin?
- Too bright?
Once you can describe the problem, finding the responsible frequency region becomes easier.
3. Choose the relevant band
Use the four bands as broad starting points.
If the bass overwhelms everything else, begin with the low band.
If the sound is cloudy, investigate the low mids.
If vocals lack definition, examine the high mids.
If the entire recording seems dull, look at the high band.
4. Find the troublesome frequency
On a parametric EQ, select a moderate or narrow Q and move the frequency while listening.
One common technique is to temporarily boost a narrow band while sweeping through frequencies until the undesirable quality becomes especially obvious. Once identified, return the gain below zero and cut that area.
Use this method carefully because a strong narrow boost can become unpleasant, particularly at high listening levels.
5. Make a small cut or boost
Start conservatively.
Try a change of a few decibels rather than immediately making a huge adjustment.
Listen again.
If the problem remains, refine the frequency or Q before simply adding more gain.
6. Compare with bypass
Switch the EQ off and back on.
This A/B comparison is critical because louder audio often seems more impressive even when it is not actually better balanced.
Your EQ should solve the original problem without creating a new one.
7. Check the result in context
An instrument that sounds fantastic by itself may not work in a complete mix.
Similarly, headphone EQ that sounds exciting on one recording can become excessive on another.
Test your adjustment with representative material before treating it as a permanent preset.
Quick Takeaway: Start flat, identify one audible problem, find its frequency region, make a small adjustment, and compare against bypass. Avoid changing all four bands simply because they are available.
Should You Cut or Boost Frequencies?
Both are legitimate techniques, but cutting is often a useful first approach when you are correcting a problem.
Suppose a vocal sounds muddy.
You could boost the highs heavily to make it appear clearer. But now you have retained the mud while adding extra brightness.
A modest low-mid cut may solve the original problem more directly.
Boosting makes sense when a desirable characteristic genuinely needs emphasis, such as adding a little body, presence, or air.
A useful decision process is:
- Identify what you dislike.
- Try removing the unwanted quality.
- Listen in context.
- Boost another region only when something still feels genuinely missing.
Subtractive EQ also helps preserve headroom, particularly when several bands would otherwise receive large boosts.
Useful quad equalizer Starting Points
EQ should be based on listening, not recipes. Still, approximate starting points can help you understand what to investigate.
| Problem | Area to Explore | Possible Approach |
| Excessive rumble | Very low frequencies | Low cut or low-band reduction |
| Boomy bass | Bass/upper bass | Gentle low cut |
| Muddy sound | Low mids | Broad, modest cut |
| Boxy vocal | Midrange | Locate resonance and cut |
| Dull vocal | Upper mids/highs | Small presence or high-shelf boost |
| Harsh instrument | High mids | Find offending region and cut |
| Excessive sibilance | Upper mids/highs | Targeted reduction or de-essing |
| Dark overall sound | High frequencies | Gentle high shelf |
| Thin sound | Low/low-mid region | Small, broad boost if needed |
These are diagnostic areas, not fixed settings.
Two microphones recording the same singer may require different EQ. The same headphones may sound different to different listeners because fit, ear anatomy, playback level, and personal preference all matter.
Using a quad equalizer for Vocals
Vocals are a good example of why four-band EQ is useful.
One band can control excessive low-frequency energy. Another can address low-mid congestion. A third can influence presence and intelligibility. The high band can shape brightness.
Start by removing unnecessary low-end energy where appropriate. Then listen for excessive warmth or boxiness.
If the vocal still struggles to cut through a mix, a small presence adjustment may help.
Do not automatically add large amounts of high-frequency gain. If the source already contains strong sibilance, boosting the upper spectrum can make “s” and “sh” sounds distracting.
The goal is not to make a vocal sound spectacular in isolation. It is to help it sound natural and intelligible in the complete recording.
Using Four-Band EQ for Music Listening
Personal listening requires a different mindset from studio mixing.
You are not correcting an individual microphone or instrument. You are adjusting the overall playback system.
For headphones and earphones, begin with a flat response and play several familiar recordings.
If the headphones consistently sound too bass-heavy, reduce the low band slightly.
If voices repeatedly sound recessed, investigate the midrange rather than simply turning everything louder.
If cymbals and consonants become uncomfortable, a high-mid or high-frequency reduction may be more useful than changing the bass.
Some modern headphone software uses four-band parametric EQ specifically for this kind of fine-tuning. Shure’s AONIC software, for example, provides adjustable frequency, gain, and bandwidth parameters across a four-band EQ.
Save a preset only after testing multiple tracks.
A setting created around one unusually dark or bright recording may not translate well to the rest of your music library.
Using Four-Band EQ for Gaming
Gaming audio presents a different balance problem.
Explosions, environmental effects, dialogue, footsteps, music, and interface sounds can occupy overlapping regions.
If strong low-frequency effects overpower other details, a modest bass reduction may make the mix easier to interpret.
For clearer speech and positional cues, carefully adjusting the midrange can sometimes be more effective than simply increasing overall volume.
Avoid extreme “competitive” EQ curves copied from another person’s setup. The result depends heavily on the game mix, headphones, DAC or sound card, and any spatial-audio processing already active.
More EQ is not automatically more detail.
Using a quad equalizer in Car Audio
Car interiors create complicated acoustic conditions.
Speaker placement is rarely symmetrical relative to the listener, and surfaces such as glass, upholstery, dashboards, and door panels influence what reaches your ears.
That means EQ can help with tonal balance, but it cannot solve every acoustic issue.
Start with:
- Tone controls and EQ flat.
- Balance and fader centered unless adjustment is necessary.
- Any extreme “bass boost” features disabled.
- Familiar, well-recorded music playing.
- Moderate listening volume.
Correct obvious problems gradually.
If bass is boomy, do not assume the subwoofer needs to be turned down completely. Crossover settings, phase, speaker positioning, and cabin resonances may also contribute.
EQ is one part of system tuning, not a substitute for proper setup.
Can a quad equalizer Fix Feedback?
It can help, but only under the right circumstances.
Acoustic feedback happens when sound from a speaker returns to a microphone, is amplified again, and creates a loop. Certain frequencies may begin ringing first because of the microphone, speaker, room, and their positions.
A parametric EQ with a narrow Q can attenuate a troublesome frequency.
However, EQ alone should not be treated as the complete solution.
Also check:
- Microphone placement
- Loudspeaker direction
- Distance between microphone and speaker
- Stage volume
- Microphone pickup pattern
- Overall system gain
Aggressively cutting many frequencies can reduce sound quality without addressing poor system geometry.
Common quad equalizer Mistakes
Boosting every band
If you boost lows, low-mids, high-mids, and highs together, you have largely increased level rather than meaningfully improved tonal balance.
Make adjustments for a reason.
Making extreme changes too quickly
Large EQ moves can initially sound exciting because they are dramatically different.
After several minutes, they may become tiring.
Start small and let your ears adapt.
Using a narrow Q for broad tonal problems
Narrow filters are excellent for resonances.
They are usually less suitable for broad changes such as making an entire mix slightly warmer.
Use a wider bandwidth or shelving filter for general tonal shaping.
Using broad cuts for narrow problems
The opposite mistake also occurs.
If one small frequency area is ringing, cutting a huge section of the midrange may remove useful musical information.
Use Q to isolate the issue.
EQing without comparing bypass
Your ears adapt quickly.
After several minutes of adjustment, an extreme curve can begin to seem normal.
Regularly bypass the EQ to remind yourself what the original signal sounded like.
Ignoring gain and clipping
Large boosts raise signal level.
Multiple boosts can reduce available headroom and potentially contribute to clipping elsewhere in the signal chain.
If your EQ curve contains several strong boosts, consider whether some of the same tonal result could be achieved through strategic cuts.
Trying to repair problems EQ cannot fix
Equalization cannot fully repair:
- Distorted recordings
- Clipping
- Severe background noise
- Poor microphone technique
- Damaged speakers
- Very poor room acoustics
- Missing audio information
It changes frequency balance; it does not reconstruct a bad source.
quad equalizer vs. 10-Band and 31-Band EQ
More bands provide more points of adjustment, but that does not automatically make an equalizer better.
| Feature | 4-Band EQ | 10-Band EQ | 31-Band EQ |
| Ease of use | High | Moderate | Lower |
| Number of adjustments | Low | Medium | High |
| Fast tone shaping | Excellent | Good | Good |
| Surgical precision | Good if parametric | Moderate if graphic | High for fixed-band correction |
| Learning curve | Relatively simple | Moderate | Higher |
| Typical use | Mixing, headphones, instruments | Playback/system tuning | Live sound/system correction |
A four-band parametric equalizer can actually offer more targeted control than a graphic EQ with more bands because its center frequencies and Q values are adjustable.
This is why comparing EQs only by the number of bands can be misleading.
A graphic EQ gives you many predetermined points.
A parametric EQ gives you fewer but more flexible filters.
Four-Band EQ vs. Quadraphonic Equalization
The word “quad” can cause confusion.
A four-band equalizer has four frequency-control sections.
A four-channel equalizer processes four separate audio channels.
A quadraphonic system is based on four-channel reproduction, historically associated with front-left, front-right, rear-left, and rear-right playback.
These concepts are not interchangeable.
A four-band EQ could process a stereo signal.
A four-channel device could provide equalization for four independent channels while having more or fewer than four EQ bands per channel.
Context tells you which meaning applies.
If a manual discusses frequency, gain, Q, low-mid, high-mid, shelves, or filters, it is describing frequency equalization.
If it discusses four lanes or channels, the word quad is describing the number of signal paths instead.
There is an entirely separate electronics meaning as well. In high-speed digital hardware, manufacturers use terms such as quad equalizer/redriver for components that compensate for transmission losses across multiple data lanes. For example, Analog Devices uses the terminology for PCI Express signal-integrity components such as the MAX14950. That is not an audio tone-control EQ.
What Makes a Good Four-Band EQ Setting?
There is no universally correct curve.
A useful setting accomplishes a specific goal while changing as little as necessary.
For most situations, a sensible workflow is:
- Begin flat.
- Listen at a comfortable volume.
- Identify one problem.
- Determine its approximate frequency region.
- Use frequency and Q to isolate it.
- Apply a modest cut or boost.
- Compare with bypass.
- Repeat only when another clear issue remains.
- Check several recordings or the full mix.
- Save the preset only after it translates well.
A flat setting is not automatically perfect, just as an EQ curve is not automatically an improvement. Shure explicitly provides EQ bypass for an unchanged frequency response, illustrating why a clean reference remains useful when judging adjustments.
Final Thoughts on quad equalizer
A quad equalizer provides a practical balance between simplicity and precision. Four bands are enough to control bass weight, low-mid muddiness, upper-mid presence, and high-frequency brightness without overwhelming the user with dozens of filters.
The most useful skill is not memorizing a “perfect” EQ preset. It is learning to hear a problem, locate its frequency region, and make the smallest adjustment that fixes it.
Start flat. Learn what the low, low-mid, high-mid, and high regions sound like. If your EQ provides frequency, gain, and Q, use those controls deliberately rather than moving every band at once.
Once you approach equalization as problem-solving rather than preset hunting, four bands can provide surprisingly precise control over vocals, music, headphones, gaming audio, car systems, and recording or live-sound setups.
